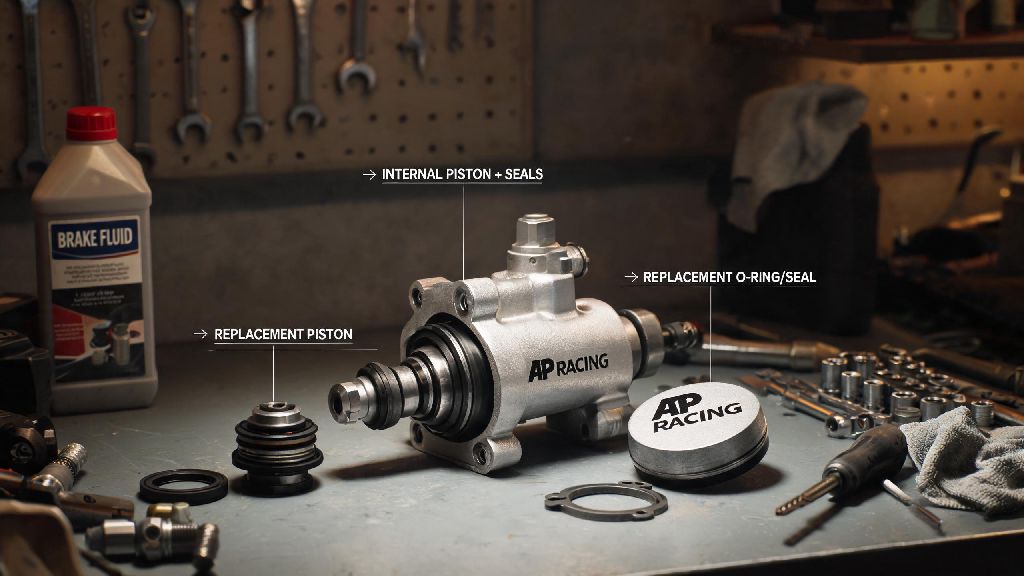
If you’ve ever hit the brakes mid-lap only to feel a soft, spongy pedal under your foot, you know how critical a fully functional master cylinder is to both your race results and safety. Worn seals, cracked pistons, or degraded O-rings can turn your reliable brake setup into a liability in seconds. For drivers running AP Racing brake systems, investing in a high-quality ap racing master cylinder rebuild kit is almost always more cost-effective than replacing the entire unit, and lets you restore factory-grade performance from the comfort of your home garage.
Key Components to Look for in an AP Racing Master Cylinder Rebuild Kit
Not all rebuild kits are created equal, and cutting corners on cheap, off-brand options will only lead to more problems down the line. Genuine or OE-matching AP Racing kits come with all the parts you need to fully refresh your unit, with components built to withstand the extreme heat and pressure of competitive racing. Skipping on quality here can lead to seal failure mid-race, so it’s worth spending a little extra for a kit that meets AP Racing’s official specifications.
Every reliable kit should include these core components: high-temperature EPDM seals that resist brake fluid corrosion and heat fade, precision-machined piston assemblies that fit your exact master cylinder model, dust boots to keep debris out of the cylinder housing, new return springs, and all required mounting O-rings. If a kit you’re looking at doesn’t explicitly list these parts, or uses generic “one-size-fits-all” seals, walk away. These kits are almost always designed for street use, and will fail after just a few hard track sessions.
You also want to make sure the kit is explicitly designed for your exact AP Racing master cylinder model. Even small differences in bore size or housing shape will make a generic kit unusable, so double check your part number before you place an order. Most reputable sellers will list compatible model numbers clearly on their product pages, so you don’t have to guess if a kit will fit.
Step-by-Step Installation Tips for First-Time Users
You don’t need a professional race shop to rebuild your master cylinder. All you need is a clean workspace, basic hand tools, and a few hours of free time to do the job right. Start by disconnecting your brake reservoir lines and draining all old brake fluid from the system, then unbolt the master cylinder from your firewall or brake booster mount. Lay out all your old parts on a clean work mat as you remove them, so you can match each part to the new component from your kit.
Take your time cleaning the inside of the master cylinder housing with brake cleaner and a lint-free cloth before you install any new parts. Even tiny bits of old seal debris or metal shavings can scratch the cylinder wall or cause leaks after you finish the rebuild. Rushing through the process is the number one cause of leaks or spongy brakes after a rebuild, so don’t hesitate to step away for a few minutes if you start feeling frustrated. Many amateur racers I work with keep quick, low-commitment casual games on hand for these short breaks, and RummyLudo is a popular pick that fits neatly into 10-minute gaps without pulling your focus away from the task long term.
Once you’ve installed all new components, you need to bench bleed the master cylinder before you bolt it back into your car. This step removes trapped air from the cylinder, which would otherwise lead to spongy brakes even after you bleed the full system. Secure the master cylinder in a vise, attach short hoses from the outlet ports back to the reservoir, and slowly pump the piston until no more air bubbles appear in the fluid. This takes 5 to 10 minutes, and it’s non-negotiable for a successful rebuild. After bench bleeding, you can reinstall the cylinder and run a full brake bleeding procedure for all four corners of your car, using clean, lint-free rags to wipe up any spilled fluid immediately.
Common Mistakes to Avoid When Rebuilding Your Master Cylinder
Even experienced mechanics make mistakes during master cylinder rebuilds, and most of these issues are easy to avoid if you know what to look for. The most common errors I see are simple oversights that can cost you a race weekend or even lead to brake failure on track, so it’s worth double checking your work at every step of the process.
If you finish your rebuild and still feel spongy brakes, don’t panic. The most common cause is trapped air somewhere in the system, so run through the brake bleeding process one more time, starting with the wheel furthest from the master cylinder and working your way closer. If leaks appear around the seal after installation, you may have nicked a seal during assembly, so you’ll need to take the cylinder apart and replace the damaged part.
How to Tell When It’s Time to Rebuild Your Master Cylinder
You don’t have to wait for total brake failure to rebuild your master cylinder. There are several clear warning signs that your seals are worn out and your unit needs a refresh. Catching these issues early will save you from costly repairs or dangerous situations on track, so make a habit of inspecting your master cylinder every time you do routine brake maintenance.
The most obvious sign is consistent spongy brake feel that doesn’t go away even after you bleed your full brake system. This almost always means worn internal seals are letting air leak into the cylinder, or fluid is slipping past the piston when you apply pressure. Visible fluid leaks around the dust boot at the back of the master cylinder are another clear red flag, as is a brake pedal that sinks slowly to the floor when you hold pressure on it at a stop.
Even if you don’t see these warning signs, it’s a good idea to rebuild your master cylinder at least once every racing season if you compete regularly. The extreme heat and pressure of hard track driving wears out seals much faster than street use, so a proactive rebuild will prevent unexpected failures mid-race. If you only drive your track car a few times a year, you can stretch this to every two to three years, but always inspect the unit for signs of wear before you head out on track.
At the end of the day, a well-executed rebuild with a quality ap racing master cylinder rebuild kit can save you hundreds of dollars compared to buying a brand new unit, while delivering the same reliable performance you expect from AP Racing parts. Take your time during installation, avoid the common mistakes we outlined, and you’ll have a brake system that feels consistent and responsive every time you hit the track. Don’t cut corners on the quality of your kit or the installation process, because your brakes are the most important safety component on your race car.