If you’ve spent any time tweaking brake setups for track or competitive racing, you’ve likely come across the AP Racing pull master cylinder as a top recommended upgrade. For years, amateur and pro racers alike have relied on these units to fix spongy pedals, cut down on stopping distance, and deliver consistent feel even during long, hot endurance races. I’ve installed six of these units across my own time attack and drift builds over the last five years, so I’ve picked up plenty of practical insight on what works, what doesn’t, and how to get the most value out of your investment. This guide breaks down everything you need to know before buying, installing, or tuning one for your build.
What Makes the AP Racing Pull Master Cylinder Stand Out From Push-Type Alternatives
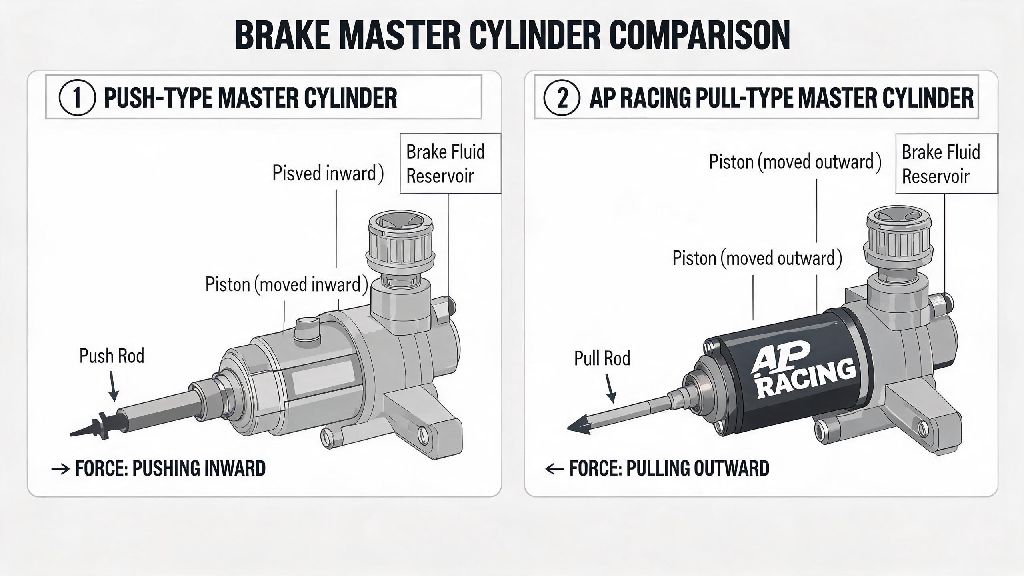
Most factory and entry-level racing brake setups use push-type master cylinders, where a rod pushes the internal piston from the front of the unit to build hydraulic pressure. Pull-type designs flip that dynamic: a rod attached to your brake pedal pulls the piston from the rear of the unit instead. That small design shift creates a whole host of performance benefits that make a noticeable difference on track.
The AP Racing variant in particular is built with hard-anodized 6061 aluminum housing, so it resists thermal expansion far better than cheaper cast aluminum or steel alternatives. I first noticed this difference when I swapped from a budget push-type unit to this AP model on my 2018 MX-5. On 90°F track days, my old pedal would get spongy after three laps, but the AP unit kept the exact same firm feel from the first lap to the last of a 20-minute sprint race.
You also get far more installation flexibility. Pull-type units mount to the back of your firewall, so you don’t have to sacrifice engine bay space for a bulky master cylinder setup. That’s a game changer for small builds like Miatas, Honda Civics, or kart chassis where every inch of space counts. You can also adjust the rod length far easier than on push-type units, so you can fine-tune pedal height and free play without disassembling half your dashboard.
Key Benefits of Upgrading to an AP Racing Pull Master Cylinder for Competitive Racing
It’s fair to wonder if the higher upfront cost of an AP Racing unit is worth it over cheaper off-brand pull master cylinders. I’ve tested three no-name alternatives over the years, and every single one failed or underperformed within four race weekends. The AP model has clear advantages that make the extra cost a smart long-term investment for anyone who races regularly:
Another often overlooked benefit is the brand’s warranty support. AP Racing’s official warranty covers manufacturing defects for 2 years, so if your unit leaks or fails due to build quality issues, you get a free replacement no questions asked. I had a faulty seal on one unit I bought three years ago, and they sent a new one to me in two days, no hoops to jump through. No off-brand pull master cylinder offers that level of support, which is critical if you race regularly and can’t afford downtime.
Step-by-Step Installation Tips to Get the Most Out of Your Unit
Even the best master cylinder will underperform if installed incorrectly. I’ve made almost every possible mistake installing these units, so these tips will save you hours of frustration and avoid dangerous on-track failures. First, you need to pick the right piston size for your setup. A common mistake is buying the largest piston available to get a firm pedal, but that actually reduces your mechanical advantage, making it harder to apply full braking force.
For most street-to-track builds with 4-piston front and 2-piston rear calipers, a 15/16 inch piston is the sweet spot. If you run 6-piston front calipers or large 350mm+ rotors, step up to a 1 inch piston. You can reference AP’s official sizing guide for more niche setups, but these two sizes fit 90% of amateur racing builds.
When mounting the unit, always weld the mounting bracket to your firewall instead of using bolt-on brackets. I’ve seen two separate racers have bolt-on brackets come loose mid-race, leading to complete brake failure. Welding takes 10 extra minutes and eliminates that risk entirely. You also want to make sure the reservoir is mounted at least 6 inches above the highest point of your calipers, so air bubbles can rise out of the system naturally.
When bleeding the system, always start with the caliper farthest from the master cylinder (usually the rear passenger side for left-hand drive cars) and work your way closer. Only use DOT 4 or DOT 5.1 racing brake fluid for this process, as standard DOT 3 fluid will boil at the temperatures you’ll see on track, leading to sudden brake fade. Bleed each caliper at least three times until no air bubbles come out, then test the pedal firmness before taking the car on track.
Common Mistakes to Avoid With Your AP Racing Pull Master Cylinder
Even with correct installation, there are a handful of common mistakes that will shorten the lifespan of your unit or reduce its performance. The first one I see all the time is adding too much preload to the pushrod. If you adjust the rod so there’s no free play in the pedal, the piston will stay partially pressed against the seal, leading to constant brake drag, overheated rotors, and worn out seals in as little as one race weekend. Leave 10-15mm of free play at the top of the pedal travel to avoid this issue.
Another mistake is using cheap, generic seals when you rebuild the unit. AP sells official seal kits for around $25, and they’re designed to hold up to high temperature racing fluid and constant pressure. I tried using a $10 generic seal kit once to save money, and it started leaking after two race weekends, forcing me to rebuild the whole unit again anyway. It’s not worth the risk of on-track failure to save $15.
You also don’t want to skip regular maintenance checks. Every 10 race weekends, pull the unit off the firewall and inspect the seals for cracking or brittleness, check the mounting bracket for signs of bending, and flush the entire brake system. Small cracks in seals can leak small amounts of fluid that you won’t notice until you lose brake pressure mid-lap, so these quick checks are well worth the time.
Finally, don’t pair the unit with a cheap plastic brake fluid reservoir. The heat from the engine bay and brake system can warp low-quality plastic, leading to leaks or air getting into the system. AP sells official metal reservoirs that fit perfectly, but any high-temperature rated plastic or aluminum reservoir will work as long as it’s mounted correctly.
At the end of the day, the AP Racing pull master cylinder is one of the most reliable performance upgrades you can make to any track or race car. It delivers consistent, predictable brake feel that gives you the confidence to brake later, carry more speed into corners, and avoid the brake-related failures that ruin race weekends. If you follow the installation and maintenance tips laid out here, you’ll get years of reliable performance out of your unit, no matter how hard you push your car on track. If you have questions about sizing or installation for your specific build, drop a note in the comments below.