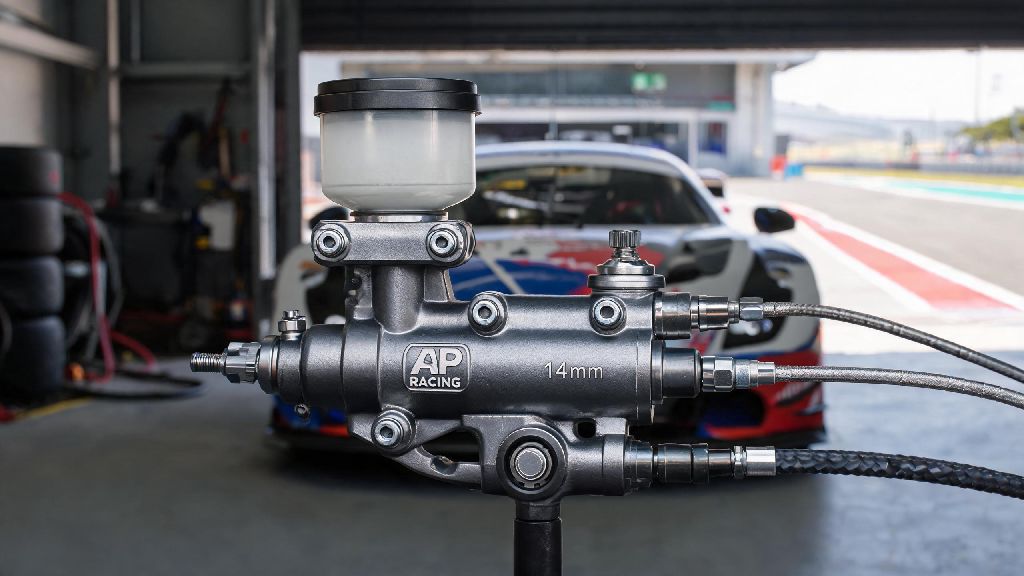
If you've ever hit the brakes mid-corner on a track and felt mushy, unresponsive feedback, or struggled to modulate pressure just enough to avoid lockups, you know how critical your brake master cylinder is to consistent, reliable performance. The AP Racing 14mm master cylinder is one of the most popular upgrades for grassroots and semi-pro race builds, thanks to its balanced bore size, durable construction, and compatibility with a wide range of caliper setups. I've installed this exact unit on three of my own track builds over the last four years, so I'm breaking down everything you need to know to decide if it's the right fit for your car, and how to get the most out of it once you install it.
Key Performance Benefits of the AP Racing 14mm Master Cylinder
This unit stands out from generic aftermarket master cylinders for a few very specific reasons that make it worth the higher price tag for serious drivers. First, its 14mm bore size is a sweet spot for most 2 to 4-piston caliper setups on compact to mid-size race cars, so it works with most common upgrade kits on the market. Better modulation is the first big win you'll notice: the smaller bore compared to stock 15+mm units means you get far more fine-grained control over brake pressure, especially useful for wet tracks or low-grip drift surfaces.
You also get consistent pedal feel even after hours of hard driving, thanks to AP Racing's hard-anodized aluminum construction that prevents seal swelling from high-temperature brake fluid. I've gone entire 8-hour endurance race weekends without any noticeable change in pedal feel with this unit, which is a huge difference from the stock master cylinder I used to run that would get spongy after 4 laps. The third key benefit is lower actuation force: you won't have to press as hard to get the same stopping power, which cuts down on driver fatigue during long sessions or multi-stage races. It's also compatible with both DOT 4 and DOT 5.1 fluids, which is a big plus for teams that switch between fluid types depending on race conditions.
How to Match the Unit to Your Existing Caliper Setup
You can't just drop this master cylinder into any build and expect perfect results, right? The first thing you need to check is your total front caliper piston area. For this 14mm unit, the ideal total front piston area is between 800 and 1200 square millimeters, which covers most 2-piston lightweight front calipers and entry-level 4-piston setups. If your total piston area is larger than that, you might end up with a pedal that travels too far before engaging, which can be dangerous on high-speed tracks.
Next, check your brake line setup: you'll get the best results if you pair it with stainless steel braided brake lines, as rubber lines flex under pressure and cancel out a lot of the improved response the master cylinder provides. When you're testing different brake bias settings after installation, it's helpful to compare notes with other drivers who run the same master cylinder on similar builds to avoid wasting hours of track time on trial and error. Many local race teams share their tested setups on community resources, and I've found really useful baseline bias settings for my hatchback build on Share Slots, where drivers upload their exact build specs and performance data for common upgrade parts.
Make sure you also bleed your system thoroughly after installation, using a pressure bleeder to eliminate all air bubbles from the lines and calipers. Even a tiny air bubble can ruin the firm, consistent pedal feel you're trying to get with this upgrade. I usually bleed my system twice after installing a new master cylinder, once right after installation and once after the first 10 laps of testing, to catch any small bubbles that worked their way into the lines during initial setup.
Common Installation Mistakes to Avoid
I've seen a lot of DIY mechanics and new race teams run into avoidable issues when installing this unit, so these are the top mistakes to skip if you want to get the best performance right out of the box:
Another common mistake is forgetting to replace the master cylinder o-rings when you install the unit. Even if the o-rings look new, they can get damaged during shipping or handling, and a leaking o-ring can lead to total brake failure mid-race. Spend the extra $5 on a replacement o-ring kit, it's not worth the risk. Also, don't reuse your old reservoir unless it's completely clean and free of any debris. Even small bits of old rubber or dirt can clog the master cylinder ports and cause inconsistent pressure that will throw off your braking.
Who Should (and Shouldn't) Buy This Master Cylinder
It's important to be realistic about whether this unit is the right fit for your build, so you don't waste money on an upgrade that won't deliver the results you want. It's perfect for you if you drive a compact to mid-size race car, run 2 or 4-piston front calipers, and prioritize modulation over raw stopping power for tight, technical tracks. It's also a great choice for endurance racers, since the durable construction holds up to hours of hard use without fading or changing pedal feel.
If you drive a full-size sedan or truck, or run 6-piston front calipers with large 350mm+ rotors, you're better off going with a 15mm or 16mm AP Racing master cylinder, as the 14mm unit won't provide enough volume to fill those large calipers quickly enough for responsive braking. You also don't need this upgrade if you only drive your car on the street and never take it to the track, as stock master cylinders are tuned for comfort and everyday use, which is more than enough for regular street driving.
I usually recommend this unit to drivers who have already upgraded their calipers and rotors, and are looking for the next step to improve their brake performance. It's not a magic fix for bad brake technique, but it will give you far more consistent feedback so you can refine your braking over time.
At the end of the day, brake upgrades are one of the most impactful changes you can make to any race build, and the AP Racing 14mm master cylinder is a reliable, cost-effective upgrade that delivers tangible performance gains for most grassroots race setups. Take the time to match it to your existing caliper and rotor setup, follow the installation instructions carefully, and you'll notice a huge difference in brake feel and consistency the first time you hit the track. I've run this unit in everything from 2-hour sprint races to 12-hour endurance events, and it's never let me down. If you're tired of inconsistent brake feel holding you back from better lap times, it's an upgrade worth considering.