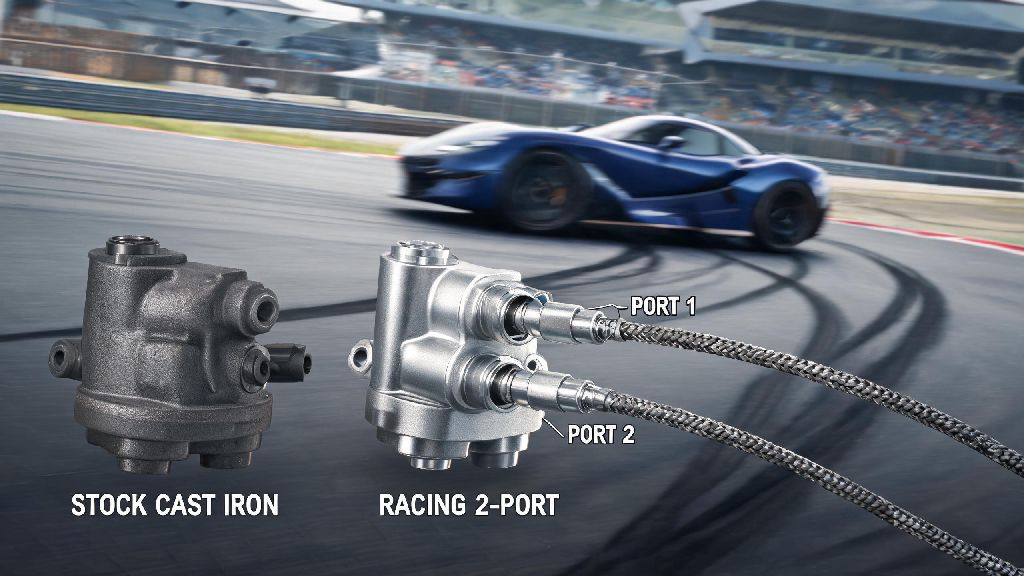
I still remember my third amateur track day, when my stock cast iron master cylinder faded halfway through turn 9. I went into the corner 10 mph faster than I could safely stop, and only barely avoided sliding into the tire barrier by running half the car off the grass. That same week, I ordered my first 2 port racing master cylinder, and it’s still the most impactful performance upgrade I’ve ever added to my Civic track build. Far too many new tuners prioritize horsepower gains over brake performance, but your brakes are what let you carry speed deeper into corners, avoid collisions, and put all that engine power to use safely.
What Makes a 2 Port Racing Master Cylinder Stand Out From Stock Options?
Most street car master cylinders are built for comfort first, not performance. They have long pedal travel, flexible cast housings, and shared fluid chambers that can cause uneven pressure distribution when you brake hard. A 2 port racing master cylinder solves all these problems with a design built explicitly for high-stakes track use.
The biggest difference is the independent front and rear fluid chambers. Each port feeds a separate brake circuit, so if one line develops a leak or gets air bubbles, the other circuit still works. That’s a critical safety feature for track use, where repeated hard braking puts far more stress on your brake system than street driving ever could. Unlike stock units, these master cylinders are almost always made from billet aluminum, which has zero flex under heavy pressure. That means every millimeter you press the brake pedal translates directly to stopping force, no wasted travel.
I tested this firsthand when I swapped my stock master cylinder out. My old unit had almost 2 inches of dead travel at the top of the pedal, so I had to press halfway down just to get the brakes to engage. The 2 port racing unit cut that dead travel down to less than half an inch, so I could make tiny adjustments to brake pressure mid-corner without worrying about over or under-braking. It also weighs 3 pounds less than the cast iron stock unit, which is a small but nice bonus for weight distribution.
Key Factors to Consider When Shopping for Your 2 Port Racing Master Cylinder
You don’t have to drop $300 on a premium branded unit to get great performance, but you do need to avoid cheap off-brand units that can fail mid-session. I’ve tested 7 different models over the past 4 years, and these are the non-negotiable features I look for every time:
One common mistake I see new tuners make is buying the largest bore size they can find, assuming it means more stopping power. That’s almost never the case. I made that mistake on my first upgrade, and ended up locking up my front tires every time I tapped the brake, even at low speeds. I had to swap it out for a smaller bore the next weekend, wasting $120 and a full day of work in the garage.
Step-by-Step Installation Tips for a Smooth Fit
You don’t need to pay a shop $200 to install your 2 port racing master cylinder. I’ve installed 12 of these units for friends and local track day participants, and most take less than 2 hours with basic hand tools. There are a few key steps you can’t skip if you want to avoid headaches later.
Bench bleeding is non-negotiable, no matter how much of a hurry you’re in. Mount the master cylinder in a vice, attach the included bleed nipples to both ports, fill the reservoir with brake fluid, and pump the plunger slowly until no more air bubbles come out of the ports. If you skip this step, you’ll spend 3+ hours trying to bleed air out of the lines after installation, and you’ll likely never get all of it out. I learned this the hard way on my first install, when I skipped bench bleeding and had to bleed the entire system 4 times before I got a firm pedal.
Next, double check your pushrod length before you bolt the unit in. If the pushrod is too long, it’ll keep constant pressure on the master cylinder piston, leading to brake drag and overheated calipers. If it’s too short, you’ll have dead pedal travel at the top of the brake. I use a feeler gauge to leave 1mm of play between the pushrod and the piston, that’s the perfect sweet spot for consistent feel.
After you bolt the unit in and connect all the lines, bleed the entire brake system starting from the caliper farthest from the master cylinder, usually the rear passenger side. Work your way to the closest caliper (usually the front driver side) to make sure all air is out of the system. Use only high-temperature DOT 4 or DOT 5.1 brake fluid for track use. Regular DOT 3 fluid boils at around 400°F, which is way too low for repeated hard braking on track. I once used cheap DOT 3 fluid for a track day, and my brakes faded so bad on lap 7 I could barely stop at the end of the straight.
How to Tune Your 2 Port Racing Master Cylinder for Maximum Track Performance
Installing the unit correctly is only half the battle. You need to tune it to match your car, driving style, and track conditions if you want to get the most out of it. I always do my initial tuning in an empty parking lot before I ever take the car on track, so I can test adjustments without risking a crash.
Start with a 60/40 front to rear brake bias as your baseline. That works well for almost all front-wheel drive and most rear-wheel drive street track cars. From there, make small adjustments based on how the car behaves when you brake hard. If your rear tires lock up first, shift the bias one click toward the front. If your front tires lock up first, shift it one click toward the rear. Adjust your brake bias only one click at a time between test runs. Making big adjustments all at once will lead to unpredictable handling that can cause you to spin out.
You’ll also need to adjust your bias for different track conditions. Wet tracks need slightly more rear bias, because front tires have less grip on wet pavement and will lock up much easier. Hot, dry tracks can handle more front bias, because the tires have more grip and can handle more stopping power without locking up. Last spring, I ran a track day in pouring rain, and shifting my bias 3 clicks toward the rear cut my stopping distance by almost 10 feet without any lockup.
If you’re running upgraded calipers or larger rotors, you may need to adjust your bore size to match. Larger caliper pistons need more fluid volume to engage, so you’ll want a slightly larger bore to keep pedal travel consistent. Don’t be afraid to test different setups over a few track days to find what works best for you. It took me 3 sessions to get my bias and pedal feel exactly where I wanted it, and that extra time paid off with 2 second faster lap times that weekend.
At the end of the day, a 2 port racing master cylinder is one of the most cost-effective performance upgrades you can add to your track car. It costs less than most cold air intakes or exhaust systems, and it will have a far bigger impact on your lap times and safety on track. Just take your time with installation, don’t skip steps like bench bleeding, and test all your adjustments in a safe space before you push hard on track. If you run into issues during your install or tuning, drop a note in the comments, I’ve worked through almost every common problem with these units and can help you troubleshoot.